Some reference for the 5 senses vectors design that will be used in the Made up curiosity app. The vectors would look something like this, not too complicated and just basic line vectors. Keeping them simple and easy to identify at a glance is the main objective. Also, they will indicate which picture in the app is linked to which sense. The vectors must also look like they are a series and should not look too different from each another.
Sunday, 9 March 2014
Friday, 7 March 2014
Kaleidoscope experiment no.1
A few materials needed for the test tube kaleidoscope outcome to experiment with. Yesterday I went to Art friend to get a few materials to make the test tube kaleidoscope, and I was quite lucky because I managed to find the materials I had in mind. I bought the biggest test tubes, cork stoppers, acrylic mirror and plastic sheet.
For this experiment, instead of using materials that are collected using the five senses, I used some colour small beads for the experiment.
To test out the making of the prism, I tried out with a post card that is hard enough to be pushed into the test tube and still be able to stay in form. I tried 2 different dimensions of 2cm x 10cm and 1.8cm x 10cm. At first it couldn't find till the bottom of the test tube, but the one with the smaller dimensions did, with enough space to cap on the cork stopper.
After that, I tried it out with the acrylic mirror. The acrylic mirror looks exactly like a mirror just that it is not made of glass, so I was able to cut it with a acrylic cutter. I have to be very careful with scoring the acrylic sheet and each extra or missing cm matters. Then, I taped the outer side of the acrylic mirror into a prism. It was able to fit in but not totally.
Lastly, I picked out some beads and sequins of different size and colour and placed them into the test tube. And here are the results, they did not disappoint but they are not what I had in mind. Because the prism did not fully enter the test tube, and the test tube being transparent, a lot of light was able to enter and reflections of the things around were reflected into the kaleidoscope. This experiment did not really succeed, but at least now I know which dimensions are the best to work with and how I can improve. Also, if we are sticking to this method, we will most probably cut and build the kaleidoscope in the school workshop.
Chemistry x Lifestyle
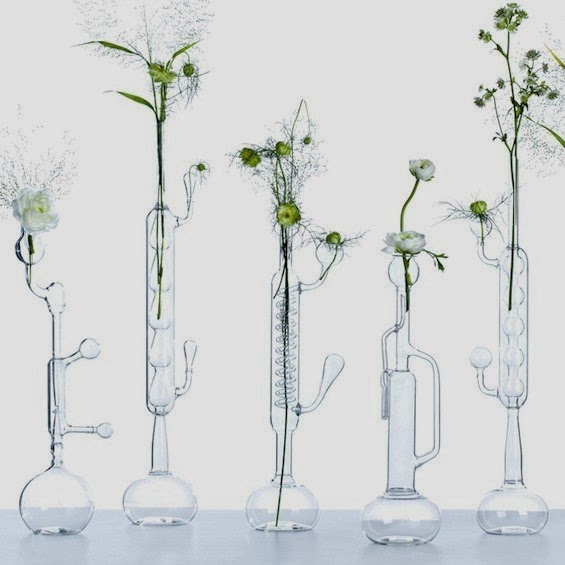
Chemistry glasswares and testubes as flower pots or vase
Using the old coffee dripper stand and glass cover to grow a plant
Flower arrangement set up at a wedding venue
Another use of the wooden retort stand that looks like a piece of decorative furniture
Salt and pepper shakers
Cocktail mixer and shot glasses
Medicine and pills container
Light ornaments and interior decorations designed out of chemistry glasswares
Today, I found some furnitures and kitchen wares that were extraordinary. They were mostly designed in the shape or inspired by the design of chemistry glasswares. Either that or the chemistry apparatus were given another function and used in another way. They are definitely eye catching and I have always loved the idea of placing one use to another form of function and I think these few examples did really well.
These images will serve as good references, because of how they look which is as important as the functionality. Now I sort of know the art direction I want to achieve and how I can curate my outcomes with the use of the chemistry glasswares and such.
Kaleidoscope DIY
For the made up curiosity x detour collaboration, we will most slightly be making the kaleidoscope ourselves. Hence I went to look into some tutorials that teaches how to make one. I found one that is done by Claire from the etsy blog. Most of the supplies needed for this great project can be found at home and some of them are even recycled.
Make the prism using mirrors, Mark the width of the mirror on both sides at 1 ½ inches, 3 inches and 4 ½ inches. Cut the mirror into 3 strips that are 1 ½ wide.
Then, Lay the 3 strips side by side upside down, leaving a small gap between them. Tape the mirrors together using masking tape and set the prism aside.
Measure out the length of your mirror strip and add ⅓ of an inch to the measurement. Take this measurement and mark it along the circumference your cardboard tube. Connect the the markings all around the tube and carefully cut the cardboard roll with your box cutter.
For the peep hole, lay the end of the cardboard tube flat on the back of the contact paper and trace a circle around it. Cut approximately 1 inch around the traced circle, then cut little notches or “rays” around the circle so that you end up with a “starburst.” Cut a triangle or circle in the center of the paper. Peel away the backing and lay the starburst on your work surface, sticky side up, and center your cardboard tube on top of it. Working your way around the tube, stick the notches of your sunburst against its edge, adding tape to secure them.
Cut out the bottom of your empty plastic container. Using your cardboard tube or another circular object as a template, trace two circles on the plastic with your permanent marker. Find another circular object that is approximately a ½ inch larger than your traced circles and draw around the previous ones using the same technique.
Add the gems in and slide your triangular prism inside your tube. Take Lens A and place it inside your tube against the edges of your prism, notches facing up. Place your selected beads on top of the plastic lens. Cap your gems using Lens B, notches facing down, and secure it to the tube with masking tape.
Materials needed :
Metal ruler
Thin acrylic mirror (I used a magnetic locker mirror)
Box cutter
Masking tape
Cardboard paper towel roll tube*
Empty plastic vegetable or fruit container
Fine permanent marker
Paper
Transparent colorful beads or “gems”
Faux wood pattern contact paper
Glitter (optional)
Measure out the length of your mirror strip and add ⅓ of an inch to the measurement. Take this measurement and mark it along the circumference your cardboard tube. Connect the the markings all around the tube and carefully cut the cardboard roll with your box cutter.
For the peep hole, lay the end of the cardboard tube flat on the back of the contact paper and trace a circle around it. Cut approximately 1 inch around the traced circle, then cut little notches or “rays” around the circle so that you end up with a “starburst.” Cut a triangle or circle in the center of the paper. Peel away the backing and lay the starburst on your work surface, sticky side up, and center your cardboard tube on top of it. Working your way around the tube, stick the notches of your sunburst against its edge, adding tape to secure them.
Credits : http://www.etsy.com/blog/en/2013/make-a-kaleidoscope/
I also found a brief tutorial on making a kaleidoscope out of a test tube, however the method is different from what I have in mind. Just in case my method doesn't work, I can always trust this tutorial and make one out of it. I am planning to get it done by work in progress and I can't wait to start!
Credit : http://www.ricen.hokkaido-c.ed.jp/e211physics/kaleidoscope/kaleidoscope1.html
Kaleidoscope for Graphic design
Since my outcome is using the mechanics of a kaleidoscope to design a solution with Graphic design, I did some research on previous works that were done with the idea of the kaleidoscope. I realised that most of the kaleidoscope related works were prints or patterns formed on prints. Very seldom to see designers building a kaleidoscope for their project outcome and I think it is such a waste because kaleidoscopes are such interactive solutions with endless possibilities. I found two examples of unconventional ways of using the kaleidoscope, using the original idea for another purpose.
Foodleidoscope is done by Pearlyn Sim, a local designer and this design is a solution to a problem.
"Foodleidoscope is derived from looking at food in a different perspective and noticing the beauty of food. Using the the mechanics of a kaleidoscope, the mirror inside allows food to be reflected into different angles and patterns. Exploring on different kinds of shapes and sizes of dry food, researching on different recipes that is used to create food that we usually eat and consume.
We quoted, “peeping through opacity” as this food packaging allows people to look at food in a totally different angle, turning something what is supposed to be “opaque”, with the help of the medium to allow people to see through."
Kaleidoscope
Kaleidoscope is another interesting idea of using the kaleidoscope to create new typography. The designer of this project placed some plastic types into the bottom of the kaleidoscope and from there many other type faces starts to form when the kaleidoscope is being rotated. Not just one basic type faces were found but also ornamental, calligraphic typefaces were spotted."My topic in seminars of typography was "Light and Typography" so I decided to create five kaleidoscopes. This toy was named by combining three Greek words: kalos - meaning beautiful; eidos - form; and skopeo - I see. A lot of glittering glass cullets makes amazing pictures because of the light. The main idea was to use characters made from coloured transparent material and convert them into abstract pictures."
Foodleidoscope
Foodleidoscope is done by Pearlyn Sim, a local designer and this design is a solution to a problem.
"Foodleidoscope is derived from looking at food in a different perspective and noticing the beauty of food. Using the the mechanics of a kaleidoscope, the mirror inside allows food to be reflected into different angles and patterns. Exploring on different kinds of shapes and sizes of dry food, researching on different recipes that is used to create food that we usually eat and consume.
We quoted, “peeping through opacity” as this food packaging allows people to look at food in a totally different angle, turning something what is supposed to be “opaque”, with the help of the medium to allow people to see through."
Credits : http://www.behance.net/gallery/Foodleidoscope/13829063
Kaleidoscope is another interesting idea of using the kaleidoscope to create new typography. The designer of this project placed some plastic types into the bottom of the kaleidoscope and from there many other type faces starts to form when the kaleidoscope is being rotated. Not just one basic type faces were found but also ornamental, calligraphic typefaces were spotted."My topic in seminars of typography was "Light and Typography" so I decided to create five kaleidoscopes. This toy was named by combining three Greek words: kalos - meaning beautiful; eidos - form; and skopeo - I see. A lot of glittering glass cullets makes amazing pictures because of the light. The main idea was to use characters made from coloured transparent material and convert them into abstract pictures."
Credits : http://www.behance.net/gallery/Kaleidoscope-made-from-typography/435006
I like the idea of both works done by the two designers, they use different objects but the same idea of using the kaleidoscope but can obtain different results and goals. The use of the kaleidoscope sort of provided them with many possibilities and clearly worked as a good solution. Which is sort of what we want to achieve with the use of the kaleidoscope, to allow users to see things in a different light which can be an inspiration for their graphic design works.
Made Up Curiosity x Detour ideation
During studio class last week, a classmates asked if I was interested to do a collaboration. Since both of our projects share a few common areas, which was to draw inspirations for design solutions. When she voiced out her idea, I had many others running in my mind almost immediately. Basically she wanted to make a kaleidoscope that can help designers use and see things in a different light and from there be inspired from the visuals.
Here’s what i’ve thought about the outcome on my side, I intend to make a test tube kaleidoscope. Which will be a space for keeping findings. because most of my outcomes are to encourage designers to go out, use their senses to observe and collect things. So I was thinking, the user will collect things that has either taste, smell, texture and can create sound and place into the test tube. From there, they can draw their inspirations from whatever patterns they see. Plus the unpredicted visuals can draw curiosity.
Perhaps her kaleidoscope could be a empty one while mine has things filled inside that the user has collected using the 5 senses.
I learn
With so obstacles going on right now, or rather for the past few months, I've decided to keep my focus on nothing else but my final year project. Even if I were to break down, I will make sure I will only do that when I submit my work during assessment day. At least I know that I never gave up and I have done myself proud. I do not want to regret for not giving my all, I don't want to disappoint others or worst, disappoint myself. This is what keeps me going :
"After a while you learn the subtle difference
Between holding a hand and chaining a soul,
And you learn that love doesn't mean leaning
And company doesn't mean security.
And you begin to learn that kisses aren't contracts
And presents aren't promises,
And you begin to accept your defeats
With your head up and your eyes open
With the grace of a woman, not the grief of a child,
And you learn to build all your roads on today
Because tomorrow's ground is too uncertain for plans
And futures have a way of falling down in mid-flight.
After a while you learn
That even sunshine burns if you get too much.
So you plant your garden and decorate your own soul,
Instead of waiting for someone to bring you flowers.
And you learn that you really can endure
That you really are strong
And you really do have worth
And you learn and learn
With every good-bye you learn."
Subscribe to:
Posts (Atom)